
I have developed my own method of fusing fabric that fuses the edges only. I thought I'd show you how I do it.
I have tried Wonder Under and other similar fusibles, but I just don't care for the stiffness, especially since I am often fusing three layers or more. I experimented with glues that could be used just on the edges, which I liked better, but those edges were very stiff. I finally found a liquid fusing product called Liquifuse. Initially I found it very difficult to use, and nearly gave up on it, because it was thick, would clog the opening on the bottle and it was hard to control. Having little to lose, I experimented, discovered that the product is water soluble and when thinned with water it is much more workable.
Here are some of the things I will be using:
- pastel pencils in the oatmeal tin—these are not regular colored pencils, they are thicker and softer
- line drawing of my design.
- diluted Liquifuse in a small bottle with a fine tip. (That's the Liquifuse as you buy it, in the bottle with the red label) The proportion is probably about 1 part water to 2 parts Liquifuse. It's not a careful measurement. I add enough water that it flows nicely, but isn't water-y. Sorry I can't be more specific than that.
- light box. You can tape your design to a sunny window if you don't have a lightbox.

Put the drawing on the light box and lay your fabric, face down on top, so you can see the design. Remember that the finished design will be the reverse of what you are seeing. For the black part of my crow I am using a black fabric with a dark gray design on it. I will use a white quilt marking pencil to trace the lines of the black parts of the crow on the back of the fabric. If I were using a lighter colored fabric, I would trace it with a black permanent marker.
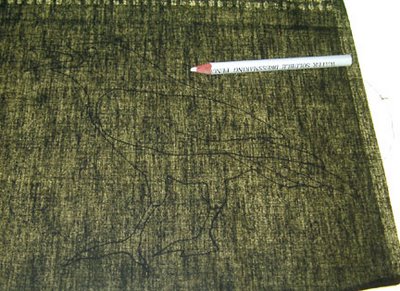
Run a line of the Liquifuse just inside the traced line. For the inside lines on the wing, I will put the liquifuse on both sides of the line, as I will be cutting away a narrow section of line in those areas.
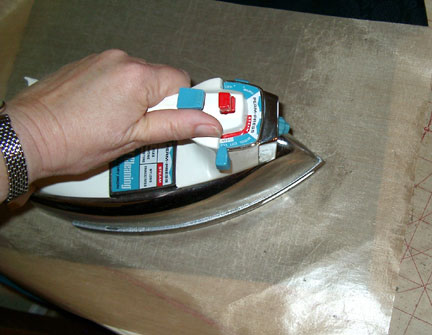
When you have traced all of the design with Liquifuse, lay the fabric on an ironing surface, with the Liqui-fuse face up. Lay a teflon ironing sheet over the top and press with a hot iron until the fabric fuses to the sheet and the Liquifuse is no longer wet. The Liquifuse can be allowed to dry before you do this step, but it isn't necessary.
Allow the fabric and ironing sheet to cool slightly, then carefully peel the ironing sheet off the fabric. You will see that you have a line of shiny fusing material outlining your design on the fabric.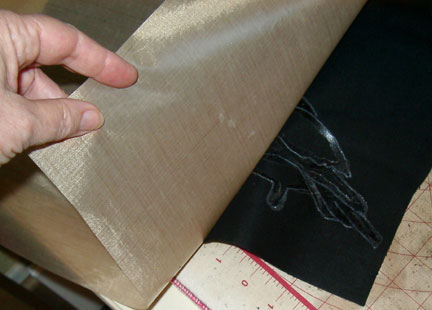
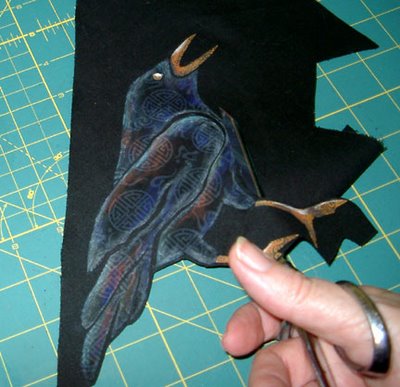
Carefully cut along the marked line. The melted Liquifuse seals the threads and you will have a clean, non-ravelling edge. At this point you have a design element that can be fused to a background if you wish. I like to fuse each element to a piece of black or dark fabric that I will cut to create a dark outline.
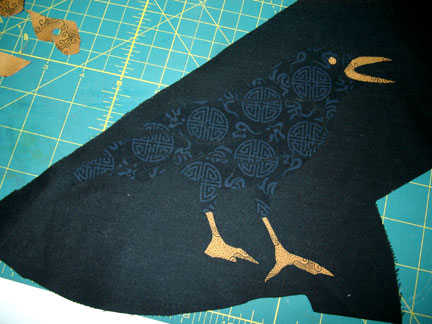
After I have fused the black and gold parts of the crow to the black scrap, I like to add detail, shading and dimension with pastel pencils. I have used fabric paint for this step as well, but I like using the pastel pencils because I don't have to wait for paint to dry to see what the actual color will look like.
To get my black outline, I flip the crow over on the light box and simply apply the Liquifuse on the back, following the outline of the fused pieces.

Again, I iron the teflon sheet to the back of the piece, cool it and peel off the sheet. Then I cut the bird out, leaving a narrow edge of the black fabric all the way around. The black also shows through where I have trimmed out the wing lines.
Now I am ready to fuse the bird to a background.
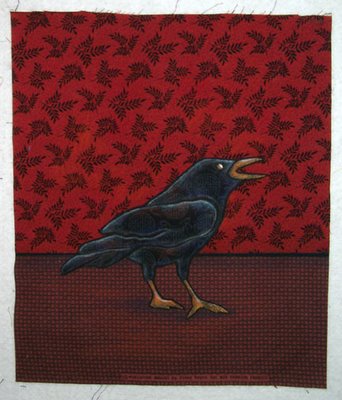
For most pieces I use a narrow zigzag stitch around all the fused edges. Occasionally I use a straight stitch just inside the fused edge instead. The piece seems to tell me what kind of stitching will work best. If I am planning to quilt very heavily, sometimes I don't use any kind of stitching on the fused edges.
 The pastel pencil needs to be set or it will smear and eventually rub off. I have used two methods for this. You can use very thinned down acrylic medium to paint over the colored areas. This secures the pastel and leaves the fabric relatively soft. I find that it sometimes dulls the pastel and can discolor black and dark fabrics, so I have started using spray fixative. It makes the fabric slightly stiff, but it softens up as you handle it and is still easily sewn through. (not nearly as stiff as a piece fused with Wonder Under) It seems to keep the colors nice and clear and does fix them. Use this outdoors. It really smells and I'm sure is not nice to breathe. The smell dissipates as it dries.
I buy the Liquifuse and plastic, pointed tip bottles at Michael's crafts. I have also found Liquifuse at some fabric stores—usually not quilt shops. I buy the pastel pencils and fixative at an art supply store.
© Terry Grant, 2006
Terry! Thanks for sharing this information. I, too, am less than thrilled with the thickness of the WonderUnder fused fabrics, so I will definitely give this LiquidFuse stuff a try. I especially like the idea that you can select a pattern piece or shape and THEN apply the fusible, without having to fuse huge hunks of fabric... This seems ideal for more detailed work. And your bird is gorgeous.
ReplyDeleteThanks so much for sharing this- I will definitely give it a try. And, thanks for telling us where you get it, I have never seen or heard of the stuff before.
ReplyDeleteThe bird is beautiful. It looks like this method works easily for smaller and detailed works, which WU doesn't always. And I have just such a work rolling round my head- -
Thanks for the nice comments about my African quilt a couple of weeks ago on my blog. I do enjoy your work, and keep checking out what you post on the blog. Oh, by the way- the blue streaks in your hair looked awesome, go for it! At least helmet heads are relatively maintenance free!! (From one who knows!!)
Beverly
Terry, thanks for sharing not only your Liquifuse info, but your applique and pastel tips.
ReplyDeleteThank you for your detailed description and clear photos to show us your methodology. I've had the Liqui Fuse (by Beacon) in my supply box for over a year but never found a satisfactory way to use it. Guess I didn't try hard enough!
ReplyDeleteBy the way, what brand(s) of pastel pencils do you use?
And do you think that the "workable fixative" will that hold up over the long haul since it's designed to be 'workable' thus not permanent?
Thanks again!
WOW.....thanks! I am a fledgling to art quilts, I struggled so with my last one and this info is greatly appreciated.
ReplyDeleteI had a month long trip to Ecudaor cancelled Aug 2004 when Hurricane Charley toally threw me for a loop. I've always felt cheated and hope to go this Aug/Sept. I had a tour of the women's cooperatives weaving villages planned......did you venture out of Quito? I had not heard of the artist, his work looks fantastic.
Oh yes, I am a former Oregonion, I guess we have some things in common.
Sorry if this comment is "inappropriate", it the first time I've responded to a blog.
Thanks again, Patricia
So cooooolll! Love that bird and the process. Now where on the internet can I get that LiquidFuse?
ReplyDeleteThanks, Terry! That was a great tutorial. I'm heading out to get some for my next fishy quilt which I must start today!!
ReplyDeletevery nice tutorial...think I will add this to my inventory of things I want to try. I've never seen the pastel pencils, but they seem like they'd be more satisfying than colored pencils...add those too...cha-ching
ReplyDeleteWow... Terry, this is so insightful! Thank you so much for sharing. And of course, the bird is beautiful!
ReplyDeleteBrilliant and THANK YOU!
ReplyDeleteCheers, Sarah
That is soooo fabulous! Thank you for sharing. I'm going to give this a whirl. Definately!
ReplyDeleteFabulous technique!! Thanks for sharing! Do you mind if I link from my blog?
ReplyDeleteThank you for your generosity in sharing your technique. It was very kind & brave of you. You should be doing a book, & teaching classes, (or do you?). Your work is wonderful. I"m sure I know you from somewhere!? APNQ?
ReplyDeleteThanks for sharing and taking us through step by step and telling us where to find Luquifuse. The bird looks great.
ReplyDeleteFabulous info!! Can't wait to try your technique. Thanks so much for sharing.
ReplyDeleteWorkable fixatif is my friend, lol. I enjoyed your process photos! Thanks!
ReplyDeletethanks so much...great tutorial!
ReplyDeleteLinda
Terry thanks for your detailed instructions on liqidFuse. I had never heard of it and had been using Steam a Seam Lite which is expensive. this looks like it will work great and is more cost effective.
ReplyDeleteTerry,I "know" you from the aol quiltchat a few years ago. You & Kris Bishop led me to the QuiltArt List and the rest is history and has been a blast for me! Need to also mention Angela McIntire for her generosity and support (not sure she or you would remember me! LOL) I have only recently begun to fuse applique, a freeing technique compared to the needle turn method! I will be using the fusing with the latest QA Challenge - Fabled Fibers - and am looking forward to giving this method a try! Thank you so very much for sharing freely and for such excellent photos. I am such a visual learner!
ReplyDeleteI can only agree with what everyone else has said. I would think a book would be very successful if the company would promise a ready supply.
ReplyDeleteThanks for the excellent instructions and photo's.
Jeanne
Terry!
ReplyDeletethank you for sharing these wonderful directions. don't you just get a kick out of what you've done for liquifuse! ;-)
love your work!!!!
Hi from New Zealand found you from Pamdora site.
ReplyDeleteI was so impressed with your applique method with
Liqi-Fuse. I hunted for it on the internat and found many retailers do not have provision for international
sales. But I did find it as Liqui-Fuse on
http://sewtrue.com.who do deal internationally.
They require goods to be puchased to the value of $20 for an internet transaction. I hope this helps all those getting anoyed with the stiffness of visofix.
Nice tutorial Terry. I really liked your piece on the 12 x 12 site.
ReplyDeleteTerry, thank you so much for generously sharing this technique. I have tried Liquifuse in the past with very limited success, but it never occurred to me to dilute it. Can't wait to try it your way!
ReplyDeleteClaudia
Terry--Thank you for sharing your technique! Your tutorial is clear and simple to follow and the photos are easy to see.
ReplyDeleteJudy Momenzadeh <><
Thanks Terry,
ReplyDeleteI am going to try this. However, do you have to iron the liquid stitch or can you just let it dry. I do not have a teflon sheet and haven't a clue where to get one.
Wishing you Joy on your Journey,
ann
Freezer pAper works as well as the Teflon sheets.
DeleteIs liquifuse permanent? Will the edges fray if using a straight stitch as you sometimes do?
ReplyDeleteAlin
Great info and tutorial. First I've heard of this product and know I can use it. I agree, changing their product name was not a good idea but maybe fusibles weren't widely know back then. The fixative is exactly what I need too. Thank you. Your art is awesome..yes, you should be teaching.
ReplyDeleteFabulous tutorial! Thanks for sharing your tricks and techniques.
ReplyDeleteI just found your blog after buying Twelve by Twelve. What great ideas you have. I love your work! Question - does the dark fabric underneath show on lighter colored fabrics?
ReplyDeleteThanks
I read your tutorial Saturday night, Sunday I was tiring it out. Wenesday I blogged about it. My effort was very plain but I enjoyed trying your technique. (I blogged it here; http://stone-belle.blogspot.com/2013/06/dr-bag.html )
ReplyDeleteI read your tutorial Saturday night, Sunday I was tiring it out. Wenesday I blogged about it. My effort was very plain but I enjoyed trying your technique. (I blogged it here; http://stone-belle.blogspot.com/2013/06/dr-bag.html )
ReplyDeleteThank you for sharing this, it looks a great method and I'm looking forward to trying it out.
ReplyDeleteGreat tutorial! I tried it myself, and will definitely use this technique again. I blogged about it here - http://www.terryaskeartquilts.com/Studio/2016/05/21/wildfire-almost-finished-2016-05-21/
ReplyDeleteThank you for a wonderful web site!
ReplyDelete