I thought for a long time about how to create dark outlines in fabric, that had the qualities of a hand-drawn line. What I mean is a natural line with slight wavers and variations in thickness. You can stitch a satin stitch around the shapes, but a satin stitch is quite uniform in width and has a mechanical quality that wasn't what I wanted. I came up with the idea of cutting the shapes from fabric and fusing them to a dark background fabric. Sometimes that is a black fabric, sometimes another dark color. I like dark blue which has a less harsh look than black, and that is what I am using for the piece I am currently working on.
For fusing I use a liquid called Liquid Thread.
I like it better than fusible web because I can fuse only the edges of the fabrics, and the piece stays soft. It also seals the cut edges and prevents raveling better than fusible web. I do find it too thick and hard to control as it comes out of the bottle, so I dilute it with a little water and put it into a smaller bottle with a small tip.
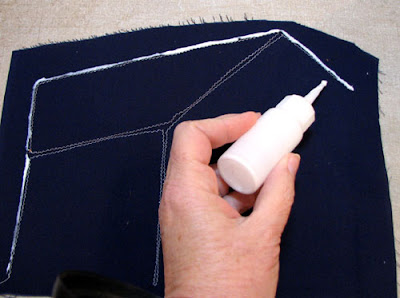
Here I am running a narrow bead of Liquid Thread around the edge of a piece I will fuse to the larger piece of navy blue fabric.
Here I have fused the three pieces of a building shape to the navy background piece, leaving a narrow line of the dark fabric showing between the pieces. After fusing, I use a very narrow zigzag stitch around each fused shape. It is barely perceptible when a matching thread is used.
Then I flip the piece over and run a bead of the fusible around the outside edge of the zigzag stitching.
Then I lay the piece, fusing side down, on a teflon ironing sheet and press until the fusing liquid melts and adheres to the ironing sheet. I let it cool for a few minutes then carefully peel it off the ironing sheet. The fusible liquid has melted onto the fabric, sealing the threads of the fabric and making a shiny line.
Now I have a shape to add to my composition, with its dark blue outline and fusible along the edges on the back side, which can be activated with an iron when I am ready to attach it to the rest of the composition.


Thanks for explaining that. It is a really interesting process.
ReplyDeleteAnother great tutorial. Thanks to a clever, talent lady.
ReplyDeleteThank you so much for sharing this with us. I was wondering how you did the dark lines also. It has a very nice finished look.
ReplyDeleteNanette Fleischman
Thanks that was helpful
ReplyDeleteGenius! I enlarged the last photos as big as I could and could see the raw edges of the main fabric and thought perhaps it was fused to a dark piece, but couldn't figure how you got such consistent 'drawn' lines! Thanks so much for showing us- that dark outline is such a Terry-indicator! It shows your graphic background!
ReplyDeleteThis technique is sheer genius! I am excited to try it.
ReplyDeleteThank you for sharing this! I'll be going tomorrow to buy some of that Liquid Thread! Do you ever trim away the inside of the piece to keep the dark fabric from showing through a very light fabric?
ReplyDeleteThanks for sharing - I didn't know about liquid thread. I'm going to have to try it out.
ReplyDeleteWhat a very clever idea. Thanks for sharing it with us.
ReplyDeleteWhat a clever technique. I can think of a number of applications for this. Thanks for sharing.
ReplyDeleteIt's is so helpful. I'm FMQING a quilt that has different fusible s in it, and it's a challenge to get all the edges, and move it under the machine. I'm going to try the fusible glue on the edges and hope it is easier to work with under the machine.
ReplyDeleteThanks so much for this post. I've thought for a while that the black outlines really make your design aesthetic pop, and I've wondered how you do it. Thanks for sharing!
ReplyDeleteI have heard this process explained by a few ladies and it just never totally clicked, but your tutorial was perfect for me! I understand all the steps now....how and why it works....Thanks for taking the time and pictures to show us.
ReplyDeleteThanks for sharing this technique! Can't wait to try it out!
ReplyDelete