
 Using the magic of Photoshop, I merged my two sketches into one.
 Then I opened the sketch in Illustrator and traced it to create a simplified line drawing.
My original idea for the background was for it to be several weavings, as they hang side by side and overlapping in the market.
 For the main weaving I used the design of one that I actually purchased in Otavalo. The others came from photographs we took.
I enlarged the line drawing and printed it to full size on regular sheets of paper that I taped together to make it full size. This got taped to a large window and I traced it onto a large sheet of paper with a thick black marker. This became the actual size "cartoon" that I worked from.
My way of working is to lay the cartoon on my light box and trace the individual pieces onto fabric a section at a time. I am tracing just inside the marker lines, then I cut and fuse the cut pieces to a larger piece of dark fabric, so the dark fabric shows up as lines between the fused sections. I use a product called "Liquifuse" for fusing rather than web type products (Wonder Under, etc.). It allows me to fuse only the edges, leaving most of the fabric soft. It also seals the edges nicely, so I don't get much fraying.
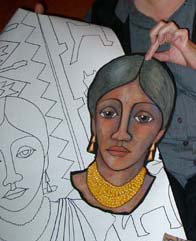 In this picture you can see the face that I have fused to black background, and the cartoon that I worked from.
Tomorrow: Decisions along the way and finishing the piece.
Where do I find Liquifuse? This would work so much better on my fish quilts that the glue baste that I use!! Thanks for posting this process.
ReplyDeleteShe's gorgeous! Thanks for sharing your process photos!!!
ReplyDelete